Tuesday, April 10, 2018

Toilet Roll Planting Pots Tips

Do you find that you have a lot of mold 

when using toilet rolls for starter planting pots?


NOTE: If video does not play try a different browser, Google Chrome has been having difficulties.

Try sterilizing your toilet paper rolls before using them.

(Caution, DO NOT LEAVE UNATTENDED) If the cardboard gets too hot it can catch fire. Do not use a high power microwave. Do not leave in the microwave for more than 30 seconds at a time and no more than a minute in a 1000 watt microwave. If you start to see scorch marks on cardboard, your leaving them in too long!

After sterilization, go ahead and cut your tubes in half.


Using your thumb and middle fingers, pack and compress your potting soil in the tube.
Make sure soil is damp but not wet. It should compress in tube and not fall out of tube.


You can then place your tubes in your plant tray. 
Add your seeds as you would a normal peat pot and go from there.


Monday, August 29, 2016

DIY electric fence insulators

Electric fencing can be expensive but there are alternatives to the high-priced electric fencing components. One such alternative is a DIY insulator for stringing your electric wire on.
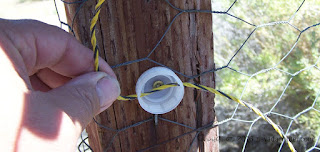
So first find a empty plastic soda or water bottle with a fairly deep lid. Don't remove the lid from the bottle until you're done making your holes and a slit. I use the water bottle to hold the lid so I can safely drill and cut the lid without having to have my hands in close proximity to cutting blades. First I drill an 8th inch hole all the way through the lid so that it comes out the other side.
 I then take a saw such as a Dremel saw blade and I cut a slit from one whole to the other.
Then I drill a 16th inch hole in the top of the lid. 
This is what I will use to screw the insulator to a fence post. Preferably a screw that will set recessed away from the wire. Optionally, once I have attached the insulator to the fence post I may use a small dab of silicone or hot glue to insulate the wire from screw if I think the wire is too close to screw. 
(A small piece of plastic placed in the lid, over the screw will also work.)
 Once I have attached the DIY plastic insulator I will give it a good coating of spray paint to keep the plastic from decomposing. Almost all plastics are treated with cornstarch so they will decompose. Personally I think it's just so that they can force people to buy more product but nonetheless a coating of spray paint will prevent plastics from decomposing. 
 
At this point you're ready to string your electric fencing, just slide the wire down through the slot into the holes on either side as shown in the photograph above.
Attach your electrical fencing to the charger and you're ready to go.

Check out our other blogs

Thursday, April 21, 2016

Guess who showed up on 18 April?

The hummingbirds started showing up in Fallon Nevada on April 18, 2016 several days earlier than last year when they showed up on April 22 .

A special thank you to my dad for keeping track of the hummingbirds and other wildlife that come and go here in Fallon, Nevada

Sunday, January 31, 2016

Dealing with Pests and Predators, finding out who the enemy is.

     Dealing with pests and predators can be a difficult task. Especially when we may not even know what we're dealing with. Fortunately in this day and age there are many electronic devices to assist us in controlling pests and predators. The first step in controlling pests and predators is in discovering what it is you're dealing with. As many of these critters may be nocturnal, you may not even know that they are coming into your garden until it's too late. Sometimes these critters will leave telltale signs as to who they are, such as tracks, droppings(fecal matter), and teeth marks, but that may not always be the case.One tool that we can use is a game camera. This is a motion activated camera that is capable of taking pictures not only during the day but at night as well. The price of these game cameras has been dropping over the years and many of them are now reasonably priced. I have used them not only to identify the pests or predator, but also to identify how these critters are getting into my garden in the first place. Kind of like finding the chinks in your armor (fencing).The camera can also help keep an eye on who is coming onto your property or going into your garden.
once you have identified your culprit, you can then easily decide the best plan of action to take care of your problem.
  Now you can use a wireless webcam, but they can have limitations such as needing to be wired to your computer, or limited as to how far away they will operate, compatibility with your software or phone, ect.
     Conventional cameras can be useful but not necessarily practical. The Gopro Hero camera can be controlled remotely but does not shoot pictures in the dark, nor is it motion activated. It is a pricey camera to be used for such a thing, but if you already own one it might be worth a try. It will shoot photos in a timed sequence, where you can set it to take photos every few seconds or minutes, but it's battery may rundown before you catch your culprit.
    As you can see there are many ways you can go with this, but if cameras are not what your looking for there are some simple things you can try.
    Tracks are a very good way to identify your enemy but some times they don't leave tracks. One way to solve this problem is to lay-down a good coating of talcum powder, powdered sugar or diatomaceous earth around the problem area. Your pest will walk threw this white powder leaving more visible tracks. Then it is a simple matter of identifying the tracks. You can also make a muddy area the animals might walk threw. The softer soil will make it easier to see tracks. Just make sure not to make it too muddy. Clay is also an option if kept damp and soft.
A good field guide to animal tracks
will not only show tracks but scats as well.

Saturday, January 30, 2016

Garden plant sensors for the brown thumb in all of us.

One of the most interesting products I have come across is the Parrot flower power sensor, a computer sensor that tells what to plant, where to plant and how to heal that sick plant. This is not the first of it's kind, but it is one of the first sensor that the average gardener could afford.  Easybloom was the first one I tried and it was about $65 at that time. And I got okay results and info that did help with my gardening. My guess is as time goes by they get cheaper with more info and features.Up until now only commercial growers could afford these things that were in the hundreds if not thousands of dollars. For $47 you too can now have expert advice for each and every plant and tree in your home and garden. Are you watering your plants too much, or is the PH too high, or is there too little sunlight for the location you have chosen? Tools like this can make you look like an instant green garden expert, and they come in every price budget.
If you are not a gardener it makes the ultimate gift for one.


Wednesday, October 28, 2015

Garden Sage, Harvest

 After picking your sage pinch off the leaves just below the leaf stem.


Place a single layer of leaves in your dehydrator and dehydrate for a day.


Sort out any bad leaves and set them aside with the stems.


   The innermost leaves are saved for freezing, because they are the most flavorful and tender parts of the plant. I use frozen herbs in place of fresh herbs, when my fresh herbs are not available.

    Stems, bad leaves and other trimmings are saved and used for either smudge sticks or potpourri, as the stems can be very bitter.
     This smudge stick was blended with wild sage, and allowed to thoroughly dry. It is wrapped with a cotton based embroidery thread. The different colored threads are used to color code the sticks so I know what each stick is made from.


Wednesday, October 7, 2015

DIY sugar ant poison

DIY sugar ant poison and save.

The basic formula for sugar ant poison is a light syrup and a 5% solution of borax. Basically if you wish to make a large quantity it would be one liter  or 100 mL of light syrup (which you can make) and then add 5 mL of borax. The approximate recipe that we use is [ 2 cups of water add 1/2 cup sugar. Bring water to a Boil ,turn off heat and then stir in sugar until desolved. Remove the light syrup from the burner and add 1  to 1 1/2 level tablespoons of borax. (Laundry soap booster) stir until completely dissolved and allow to cool. 

Once you have your poison syrup made you can dispense it with a squeeze bottle into soda pop bottle caps. You can then place these baited bottle caps wherever you see ant activity. I refill the caps once a day until I see a reduction in ant activity. It may take several months before I see real results but usually I do not see the ants return for several years after I have eliminated them completely.
Caution: 
This ant bait is toxic if ingested in large quantities and you should keep it out of reach of children and pets. Make sure you clearly label all containers with the ingredients,  recipe used, and be sure to include contact information for the Poison Control Center should you need it. Do not dispense more than half a teaspoon per bottle cap so that if it is accidentally ingested it is not in large enough quantity to be fatal.
Note: an adjustment has been made to recipe as it may have been on the strong side, do to a math Error. but you still want a 5% solution.